Black Knight Fortress
Start: Begin by talking to Sir Amik Varze, located in Falador Castle, about a quest.
Skills: The ability to defend against level 33 Black Knights.
Quests: 12 Quest Points.
What You Need: A Bronze Medium Helmet, Iron Chainmail, and a Cabbage grown from any garden except for the one in Draynor Manor.
Recommended Items: Food and armor as a precaution against the knights in the castle.
A Bronze Medium Helmet can be obtained through the Smithing Skill by smithing 1 bronze bar with a smithing level of 3. You can also buy these from Peska in the Barbarian Village for the price of 24 coins.
An Iron Chainmail can be made from 3 iron bars at level 26 smithing. You can also buy one from Wayne in Falador for the price of 210 coins
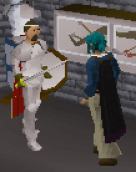
Now that you have all the items you need, it's time to go and start the quest. To start the quest, talk to Sir Amik Varze on the 3rd floor of the White Knights' castle in Falador. If you have trouble finding him this is the White Knights' Fortress
Inside the Fortress
First of all wear your iron chain-mail and your bronze helm. Open the 'sturdy door' on the south side of the building. Now that you are inside, there is no further need to impersonate a guard so you may wear your normal armor
Climb up the ladder, then the ladder you find on the next floor. You should now be on the 3rd floor, however there re some boxes that block your way to the eastern half. There is a ladder heading down slightly to the east of you that you must then climb down.
Head up the ladder in the eastern room and you will find yourself on the 3rd floor again, behind the obstructive boxes from earlier. Head down the ladder that is just next to you.
This room is a safe haven. The black knights can not get to you, and you can recharge your prayer. If you are low on life you can wait here until some of it regenerates
When you have recovered, exit the room by the door to the west. A Black Knight will be very hospitable and greet you with a fierce: "Die intruder!!!" And will attack you no matter what your level. You do not need to kill him, just run past and down the ladder. You will now be on the bottom floor again, run along the corridor and 'listen at grill'.
Your character will crouch down and over-hear the plan to give the Black Knights an invincibility potion... But do not fear, you can ruin everything! All you need is one small cabbage...
Head back to the entrance of the fortress, just follow the guide so far in reverse order if you are worried about losing yourself. The door to the east is the door to the meeting room, try to go in but the guard will stop you:
Say that you'll go anyways....than you'll see a ladder and climb it.
Walk along this passage, and you will need to push yet another wall.
Be very careful that you use the cabbage with the hole, because if you do not right-click you will eat it!
The witch will throw a fit.
Now you can leave to go get your reward from Sir Amik Varze. To get out you can back-track to the entrance and walk to Falador, or you can homeport and walk there from Lumbridge.
Cook's Assistant
Start: Begin by speaking with the Cook in Lumbridge Castle.
Skills None!
Quests: None!
What You Need: 1 Bucket and a Pot
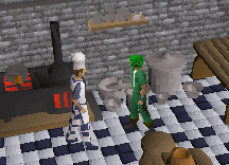
To start this quest, go to Lumbridge Castle and speak with the Cook on the first floor. He says that he's forgotten some of the ingredients for the cake that he was going to bake for the King. Tell him that you'll help him out, and he says that he needs some milk, an egg, and some flour
So, leave the castle and head north along the road until you reach the General Store. Buy a bucket for 2gp, and a pot for 1gp. Now we can get all of the ingredients for the cake
Now that you've got all of the ingredients, head back to the cook by traveling east on the road until you reach the castle. Talk to him again, give him the milk, egg and flour, and you're finished!
Now that you've got all of the ingredients, head back to the cook by traveling east on the road until you reach the castle. Talk to him again, give him the milk, egg and flour, and you're finished!
Demon Slayer

Start: Begin by speaking to the Gypsy in Varrock.
Skills: Able to defeat a level 27 demon.
Quests: None!
What You Need: A Bucket of Water, 25 Bones and 1gp.
First off, visit the Gypsy in the city of Varrock.
She can be found in the tent next to the Clothing Shop (red circle on the map), and when you talk to her she wants to read your future, but you need to "cross [her] palm with silver". In other words, just give her 1 gp. You can then choose any of the three options. Then ask her who Delrith is, and she talks of an old tale…
Dark wizards gathered in beneath Varrock to summon the Delrith, a vicious monster that they hoped would render Varrock into rubble. Luckily, Wally, the hero, came just in time.
And our (humble) hero managed to defeat the Demon and bind him within the stone Circle that we see now below Varrock.
Ask how you can kill the demon, and she says that you need a Silverlight Sword and an incantation -- be sure to write down the incantation that she gives you (it's different for everyone)! She tells you to talk to Sir Prysin about the sword.
Sir Prysin can be found in a small room on the west side of Varrock Castle (blue circle on the map). He tends to wander out of this room, however, so be warned.
At first he is surprised when you mention the Delrith.
After you explain about Gypsy Aris’ premonition, he understands the city’s plight. Unfortunately, he says that he has the Silverlight, but he needs 3 keys to open the box.
He says that Captain Rovin has a key, and tells you where he is.
Climb 2 sets of stairs in the northwest corner of the castle to find him, and tell him that it's important that you speak to him. Captain Rovin is at first mistrusting of you.
After a bit of arguing however, he finally gives in and lets you have the key.
Sir Prysin also said that he had a key, but dropped it down the kitchen drain.
Go back downstairs and head to the kitchen in the northeast corner of the castle. You will see a drain there.
You see the key, but you can’t reach it. You’re going to have to get it below, but you have to wash it down first.
Use the bucket of water you should have in your inventory with the drain just outside the kitchen door to wash the key into the Varrock Sewer. If you don't have
one, you can go up the stairs, and pick up a bucket from either of the rooms, and then fill it with water from the kitchen sink.
The entrance to the sewer is just east of the castle fountain area manhole (yellow circle on the map), so climb down the manhole.
Take the red path to a small room, and the key should be on the ground, surrounded by corpses.
Just click on it and you'll get a rusty Silverlight Key.
Traiborn's Key
The last key is with Wizard Traiborn, located on the second floor of the Wizard Tower, just south of Draynor Village.
Tell him that you need Sir Prysin's key, and then ask him if he has any keys around. He is totally confused.
He finally remembers a key, but he needs 25 bones to perform a ritual to open the box that it's in.
You can kill the wizards in the tower to collect bones, but a quicker way to obtain them would be to kill chickens. There's a farm east of Draynor Village (blue circle on the map).
You can give him the bones gradually. In other words, you don't have to give all 25 bones at once. However, it quicker to do it all at once if you are killing chickens for them. When you give him all the bones, a very short mini-cut scene will ensue where he performs the ritual and a wardrobe will rise from the floor. He will take his Silverlight Key out and give it to you.
Obtaining the Silverlight Sword
Once you have all 3 keys, go back to Sir Prysin. Another very small mini-cut scene will happen as he opens the box and gives the Silverlight to you, and which you then brandish about for a bit.
Hint: If you drop your Silverlight and talk to Sir Prysin, he will give you another sword. This way, you could have an extra in case you lose your sword after the quest, instead of having to buy one for 500gp later on.
Killing the Demon
Once you have all your combat equipment and food ready, head to the Stone Circle just south of Varrock. Once you get within close proximity of the circle, a big cut scene starts. You see three dark wizards and a wizard called Denath.
All the Dark Wizards begin to chant.
They finally summon the supremely evil Demon.
This might be the end for Varrock!
But you arrive just in time!
When you enter the circle, a wizard will start attacking you, so you will have to kill it and go to the Delrith. Or, you can wait until all the Dark Wizards are facing away from you and the Delrith is close to you and then run to him. With your Silverlight equipped, attack the Demon until he is in a weakened state. When he is in this state, pick the right incantation (refer to the incantation you wrote down earlier) and finish off the foul Demon.
Congratulations, quest complete!
Rewards
You get to keep the Silverlight sword - If you ever lose it, you can buy another from Sir Prysin in Varrock Castle for 500gp 3 Quest Points
Doric's Quest
Start: Speak with Doric by following the Northern road leaving Falador.
Skills: None!
Quests: None!
What You Need: 6 Clay, 4 Copper ores and 2 Iron ores.
To start this quest, first speak to Doric, the friendly Dwarf located in a small house North of Falador. Ask him if you can use his anvils, and he says that he will let you use them if you get some things for him. He needs 6 Clay, 4 Copper ores and 2 Iron ores.
Getting the Ores
Each of the required materials that Doric needs can be mined from the Dwarven Mines, a short distance from where this quest begins. If you aren't a high enough level to mine Iron, you can either buy the ores from the Drogo Dwarf's Mining Shop in the mines, or trade them from other players.
The shop is to the east when you first enter the mines, and you can buy iron for around 1gp each. The shop will also sell copper in small amounts, so it's best to mine the ores yourself. Once you've got all of the needed ores, just head back to Doric, give him the ores and you're finished the quest.
Dragon slayer ++++++
Start: Talk to the Guild Master of the Champion's Guild about the Rune Platemail.
Skills: Able to defeat a level 83 Dragon, and level 37 or 43 prayer is helpful. See the Fighting the Dragon section for my level and item recommendations.
Quests: Must be a member of the Champions' Guild, which requires you to have 33 quest points.
What You Need: A Wizard's Mind Bomb, Silk, Lobster Pot, an Unfired Bowl, 12,000gp (or 2,000gp if your magic level is 31 or higher with a Wizard's Mind Bomb), an Anti Dragon Shield, 3 Planks, 90 Steel Nails and a Hammer.
To start this adventure, talk to the Guild Master who can be found in the Champions' Guild.
Ask him about the rune platemail.
Finding Oziach
Oziach can be found in Edgeville. Follow the map above, and he can be found in his house that has a yellow circle surrounding it.
Tell Oziach that the Guild Master told you about him, and the rune platemail. Oziach wants you to prove yourself, by slaying the legendary Elvarg the Dragon. Ask if there is anything you need, and Oziach recommends an anti-dragon shield. Dragons breathe harmful fire, of course! This mother dragon called Elvarg can be found on Crandor Isle, but you will need a map to follow to know how to get there. The map has been torn into 3 pieces, which you will need to find. Oziach will now tell you that the Guild Master has the key to Melzar's Maze. Find your way back to the start of the quest and talk to the Guild Master. He will give you a maze key!
The Anti-Dragon Shield
To fight a dangerous dragon, you will need a good shield to protect you from the dangerous fire breath. Duke Horacio of Lumbridge has the anti-dragon shield that you will need. To get to Lumbridge, easily cast the Home Teleport spell and you will arrive at the courtyard of the castle. The Duke is located on the second floor of his castle. After a chat, you will receive the anti-dragon shield. Take care of it.
Hint: Should you ever lose your Anti-Dragon Shield, you can simply talk to Duke Horacio again to receive another.
Melzar's Map Piece
This is the hardest map piece to obtain, as it requires a killing powerful demon. Come prepared with some decent food like lobsters, swordfish or tuna, some good armour and a decent weapon. If you have a high enough magic level, bringing teleport runes will ensure your safety. You do not need the anti dragon shield to fight the demon.
Now that you are prepared with your equipment, it's time to get the map piece. The map piece is found in Melzar's Maze, and you'll need the Maze Key that was given to you earlier by Oziach to enter the maze. The maze can be found by following the map above. Once you arrive, use the maze key with the door to enter. If you have lost your maze key, return to the Guild Master and ask him for another.
Now, you'll need to kill the giant rats in the room until one of them drops a red key. Once you have the red key, use it with the door in the northwest corner of the room and climb the ladder.
Next, kill the ghosts until they drop an orange key. Once the key is dropped, pick it up and use it on the door second from the north on the east wall. Head up the ladder in the small room after opening the door.
After that, kill the skeletons until they drop a yellow key, which you'll need to use to open the southwest door. Next, head down the next three ladders.
Finally, you'll enter a room with several zombies. Begin to kill zombies until they drop a blue key. Use the key with the blue painted door and you will enter a new room.
A level-43 Melzar the Mad will attack you, and he will say all sorts of very funny things. Once he is dead, get prepared for the hardest battle. Once you're ready, use the key dropped by Melzar with the door and slay the level-82 lesser demon.
It will drop a green key, which you can use on the last door. Now, open and search the chest to obtain the first map piece! Congratulations!
Thelzar's Map Piece
The holder of the second map piece is the Oracle, who can be found on Ice Mountain (see the above map). The Oracle's location is the yellow circle. Once you arrive, bring up the subject of the map piece.
She says you'll need several items in order to enter a room with the map piece inside. The following items are needed:
Wizard's Mind Bomb - bought from the Falador pub for 3gp. Lobster Pot - bought from the fishing shops in Port Sarim and Catherby. Unfired Bowl - made by using soft clay on a pottery wheel and selecting bowl. Silk - bought for 2gp from the Silk Trader in Al Kharid if you haggle, and 55gp from the Clothing Store in Varrock.
Once you have retrieved the items, head over into the Dwarven Mines, which can be seen on the map above. Climb down the ladder and go to the door that is in front of the room circled in yellow. Now use each of the items with the door until you only have just a beer glass left. Now you can enter the room.
Enter the room.
Open and search the chest, and you will have Thelzar's map piece! Congratulations!
Lozar's Map Piece
We've saved the easiest for last! Lozar's Map Piece requires you simply to have 10,000gp if you don't have level-31 Magic or higher. Alternatively, if you have level-33 Magic or higher, you'll need one law rune and one air rune. If you magic level is 31 or 32, bring a Wizard's Mind Bomb to help boost your magic level. If you are not paying the 10,000gp, items for magic or ranged attacks are needed. Once you have all the required items, head to the Port Sarim jail. Following the map below will bring you there.
Once you get there, go to the third cell south and you will see Wormbrain.
If you have brought magic or range attack and your telekinetic grab runes (with a wizards' mind bomb if your magic level is 31 or 32), start shooting your spells or arrows at Wormbrain until he is dead. Once he is finished off, cast your telekinetic grab spell then click on the map piece. Congratulations!
If you have brought 10,000gp, simply talk to Wormbrain and buy the map piece for a hefty price of 10,000 coins! Congratulations!
The Boat
Now that you've retrieved all of the Crandor map pieces, you need a boat to get to the Island! You need to go back to the Guildmaster. He is in the Champions' Guild, where you started this quest. Klarense in Port Sarim (where you found Wormbrain) is the answer to your prayers. Follow the map below and Klarense is in the yellow circle.
Talk to him about buying the boat, and he will put a 2,000gp price tag on the boat.
Accept, and the boat is yours! Climb aboard the boat and go below deck and you will see a big hole. It needs to be fixed. To fix the hole you need the following items:
3 planks - planks can be found in the Graveyard of Shadows, which is in level-19 wilderness. They can also be obtained by taking a log with some coins to the Sawmill Operator northeast of Varrock, or picked up on Entrana. 90 steel nails - these can be smithed with a steel bar, or bought from other players.
Once you have obtained those items, go back to the boat with them. Use each plank on the hole and the boat will be fixed! Well done! The Lady Lumbridge is now ready to set sail!
Kitting Up and Going to Crandor
If you use the map pieces with each other, they will turn into a Crandor map. For this next part, you'll need to talk to Ned, who can be found in his house in Draynor Village.
By following the map above you will be able to find Ned. After talking to him, he'll take your map and will meet you at the Lady Lumbridge.
Now, you need to prepare your equipment for killing the dragon. Here is a detailed list of things you will need to fight Elvarg.
You must be combat level 40-90 to do it and have full lobster inventory.
Lobsters or swordfish to heal big amounts of damage. The dragon can hit up to 10 damage! A strength potion is optional but will really help you. You could also bring some emergency teleport runes incase something goes wrong
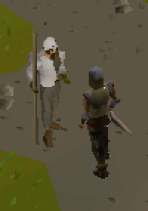
The rune armour can be replaced with adamant armour, as can the weapon. An amulet of power and strength will help a lot, too. Bringing a cape will also provide a small, yet precious, defense bonus. Do not forget the anti-dragon shield, or you are as good as dead! Here is a picture of somebody who forgot their shield
Once you're all kitted up, head to Ned at the Lady Lumbridge. Go below the deck and you will set sail for Crandor! Unfortunately, the dragon will attack the boat with fire breath and kill Cabin Boy Jenkins!
You will be forced to run away, and will wash up on Crandor. Ned appears to be missing, too!
Now, make your way to the cave entrance by following the map below.
Note: If you have fixed the boat and crashed it, you can use the shortcut wall under the Karamja Volcano. It is a much faster way to get to the dragon again if you die.
Once you've headed down into the volcano, go southeast for a while until you see a wall.
Now is the time to take a dose of strength potion, if you have one. Wield your anti dragon shield and activate prayers, such as ultimate strength and protection from melee or magic. The dragon uses a mixture of both. Once you're ready, head into the area and start attacking Elvarg. Don't let your hitpoints get too low!
After a long battle, Elvarg will hopefully be defeated. If it's the latter, you will cut off the dragon's head. You'll need to find your way back to Oziach, and after talking to him, congratulations, quest complete!
Ernest the chicken.+++
Start: Begin by speaking to Veronica outside Draynor Manor.
Skills: None!
Quests: None!
What You Need: A Pressure Gauge, Rubber Tube, Oil Can, Fish Food, a bottle of Poison, a Spade, and a Small Key.
Getting Started
First off, speak to Veronica who will be wandering around near the gate of Draynor Manor. The manor is just north of Draynor Village. She says that she's in trouble, and tell her that you can help. Continue north along the path until you reach a large building and go inside.
Climb the first set of stairs in the room, and then climb the smaller staircase leading to the third floor. Talk to Professor Oddenstein, the eccentric-looking scientist in the room, and ask him about Ernest. The Professor says that he has turned him into a chicken. Tell him to change him back, and he says that his machine is broken and he needs several parts to get it running again. He needs a Pressure Gauge, a Rubber tube, and an Oil Can.
Pressure Gauge & Rubber Tube
With the list of needed items to get the machine running again, go back down the stairs leading to the second floor. Walk past the other set of stairs and notice the box of Fish Food on the floor across from the stairs. Pick it up and go down the stairs leading to the ground floor. Now go through the north door, and into the kitchen to the west. Next to the stove is a door, and in the small room is a bottle of Poison.
Now leave the kitchen and head into the room with a black and grey checkered floor. Next to the stairs is a room with a Spade in the corner. Pick it up and leave through the door. Walk around the Mansion, first to the north, and then to the west. When you come upon a Compost Heap, walk up to it and use your spade with it to find a Small Key.
Continue south until you reach a fountain filled with vicious Piranhas. Use the Poison with the Fish Food to poison it, and then use the Poisoned Fish Food with the fountain to kill them. Search it to find the Pressure Gauge. Now walk to the east and go back into the Manor. Just past the staircase is a small closet. Use the Small Key with the door and pick up the Rubber Tube .
The Oil Can
Leave the closet and walk into the room with a pink floor and search the bookcase on the west wall to find a secret door. Now climb down the ladder into a basement filled with small rooms and levers on the walls. This is the tricky part of the quest, and you need to pull the levers in order and continue into the correct room.
To help you with this quest, I've made a map of the maze with the levers and doors
First, pull levers A and B down. Go through door 1 and pull lever D down. Walk through doors 2 and 3, and pull levers A and B up. Go back through door 3, and through 4 and 5. Pull levers E and F down, and head out door 6, and through door 7. Now pull lever C down, and go back through doors 7 and 6. Pull lever E up and go through doors 6, 8 and 3. Now you can go through door 9 and pick up an Oil Can.
Fixing the Machine
Now go back up the ladder and pull the lever on the wall to open the secret door up. Head back upstairs to Professor Oddenstein and give him the parts to the machine. He'll fix it and turn Ernest back into a human, and you've finished the quest!
Rewards
300gp
4 Quest Points
Goblin Diplomacy.++

Start: Talk to one of the Goblin Generals in Goblin Village, found north of Falador.
Skills: None!
Quests: None!
What You Need: 3 pieces of Goblin Mail, Red, Yellow and Blue Dyes, and about 50gp.
Getting Started
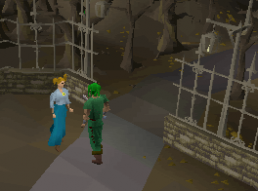
Firstly, visit the Goblin Village just north of Falador and speak to either General Wartface or General Bentnoze to hear them arguing back and forth about different armor colors. Ask them if they would like you to choose a color for them, and they both seem to agree on trying some Orange Goblin Mail.
Colored Goblin Mails
Since Goblins will only drop regular Goblin Mail, you're going to need to color the armor somehow. Aggie, the witch in Draynor Village should be able to help you by making some colorful dyes. You need to have 3 different dyes made, and each one requires a different ingredient, along with 5gp. You'll need a Red Dye consisting of 3 sets of Red Berries, a Yellow Dye made from 2 Onions, and a Blue Dye made from 2 Woad Leaves .
Red Berries are found east of the Varrock Stone Circle. You can pick Onions from the garden just north of Rimmington, and Woad Leaves can be bought from Wyson the Gardener in Falador for just 20gp for a set of 2. Once you've gotten the 3 dyes, go back to the Goblin Village and start killing Goblins to get a Goblin Mail.
Mix the Red and Yellow Dyes together to make an Orange Dye, and then use it with the mail to make an Orange Goblin Mail. Use this on either of the Generals and a cut-scene follows where Grubfoot will walk into a changing room and put it on.
Neither of the Generals like it and they decide to try a blue mail. Use your Blue Dye with another Goblin Mail to get a Blue Goblin Mail. Again, use this with either General and a cut-scene with Grubfoot changing from Orange Mail to Blue Mail follows.
Still the Generals aren't satisfied and want to try a Brown Goblin Mail. Don't be alarmed because you haven't got the dye for it: instead, you can search a crate in the house in the west part of Goblin Village for a Brown Goblin Mail. Use this with one of the Generals and once again a cut-scene of Grubfoot changing gear.
After this, both Generals agree this is the best color.
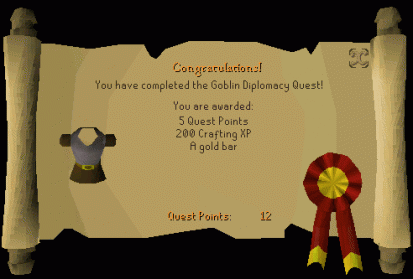
Quest complete!
Rewards
A Gold Bar
200 Crafting Experience
5 Quest Points
Imp Catcher++
Start: To begin this quest you have to speak to Wizard Mizgog located in the Wizards' Tower.
Skills: A bit of patience and the ability to defeat Level 2 Imps.
Quests: None!
What You Need: Red, Yellow, Black and White Beads
Home Teleport and Walking: There are two methods to doing this. The first is simplest and would be best used by players who have just begun playing RuneScape as it doesn't take you into places where you could possibly get lost. To use the first method use the Home Teleport spell. From there walk north and continue following the path until you come to a crossroads. Either read the signpost or head south to arrive in Draynor Village. Keep following the road South and you will come to a big stone bridge. Head across that and you are in the Wizards' Tower.
The second method would be suggested to players who have explored the F2P area a bit more then people who have just started playing RuneScape. Head north once again until you come to the General Store. Walk behind it and you will see a dark brown path. Follow this through a dark looking forest filled with Goblins and the occasional Spider. Once you get to the end of the brown path you should be near the bridge to Wizards' Tower. Just walk across like in the other method and you are there.
For Members there is also these added options of getting to the Wizards' Tower. One of them is to use an Amulet Of Glory to teleport to Draynor Village and then head South to the Wizards Tower.
Another method is to use the Fairy Rings. With a Dramen Staff equipped use any teleport to Zanaris spell and then with the Fairy Ring behind the tower use the code "DIS".
Getting Started
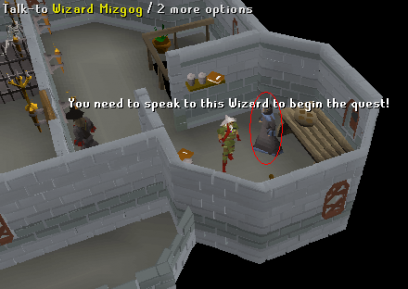
To begin the quest you need to speak to a wizard within the tower. He is located on the third Floor and there is a picture below to help you identify him from the people on the third Floor.
Start talking with Wizard Mizgog and ask him for a quest PLEASE and you will find out that he needs help with something. It would appear that a rival of his; Wizard Grayzag has enlisted the help of hundreds of Imps. He tells you that the Imps have stolen his four magical beads and that they are located all over the kingdom.
He would like your help in getting them back.
Acquiring the Beads
There are two ways of getting the beads you need to finish Imp Catcher. By far the easiest way is to buy them off of another player.
But if you are up for a challenge and think you have a bit of patience, try and kill the Imps to get them back. The Imps are spread all over RuneScape and you can find them nearly anywhere there is a major city or town. The most common places to find them is south of Falador, just below the wall. Around all the entrances and exits of Varrock. They are difficult to kill because the quite often teleport around and out of battle before you get a chance to deliver the final blow. If you are a higher level, this will be no problem as you can just one-hit-kill them. Another problem is that their drops aren't always 100% beads. They will drop Bread, Ashes and Flour Pots just to name a few. Just stick at it and you will get the beads in no time at all.
Finishing the Quest
Once you have the beads head back to the Wizards' Tower and talk to Wizard Mizgog again to give them back to him. He will mention that he needs to find out if they're his beads and then he will place them into a device on his table. This triggers a cut-scene and ultimately the end of the quest.
The Knight's Sword+++
Start: Talk to the Squire in the Falador White Knight Castle.
Skills: You need at least 10 Mining, and the ability to defend against level 57 Ice Warriors and level 53 Ice Giants.
Quests: None!
What You Need: A Redberry Pie, Portrait of Sir Vyvin's sword, a Blurite Ore and 2 Iron bars.
Getting Started
Firstly, speak with Sir Vyvin's Squire who can usually be found wandering the Falador Castle garden. Ask him how life as a squire is, and he says that he's lost Sir Vyvin's sword. Tell him that you will try and make him a new one, and he says that the sword was made by the Imcando Dwarves.
Now ask the Squire if the Dwarves will make him another, and he tells you to ask Reldo, the librarian of Varrock Castle about them. Tell him that you'll find out about the Dwarves and try to help.
Finding the Dwarf
Head over to Varrock and look for Reldo, the helpful librarian of Varrock Castle. He's usually found in his library towards the north side of the castle, and ask him about the Imcando Dwarves. He explains to you that they were almost completely wiped out from the Barbarian attacks, but some may still exist.
Reldo tells you to check the cliffs near Port Sarim, and that you'll probably need a Redberry Pie to get the Dwarf to help you. You can either buy a Redberry Pie from another player, or cook it yourself, provided that you have level 10 Cooking.
Once you've got the pie, head to Port Sarim, just a short distance south of Falador. Continue walking south until you reach a cliff where you should see a small house and a Dwarf named Thurgo. Ask him if he'd like some Redberry Pie, and speak with him again to ask if he will make you a sword. He says that if you get him a picture, he could probably smith it for you.
The Knight's Sword
Now go back to the Squire in Falador and ask him if there's a picture of the sword. He tells you that Sir Vyvin has one in his cupboard in the Castle. Go inside through the main entrance and climb up the ladder. Climb up the stairs in the next room, and upstairs should be a small room to the south. Open the cupboard inside and search for a Portrait of the sword.
Now that you've got the portrait, bring it to Thurgo to let him look at it. He says that he needs 2 Iron bars and 1 Blurite ore to make a copy of it. You can either smith or buy the iron bars from another player. Blurite ore can be found in the cave right near Thurgo's house, but it may be a little tricky to get at.
Inside the cave entrance are Muggers, which you can probably slip by quite easily. Next is a group of Pirates, which are more difficult, along with a few Hobgoblins. After following the passage for awhile you will come across an area covered in ice. Toward the east side of the cave can be found 2 Blurite rocks, guarded by many level 57 Ice Warriors and several level 53 Ice Giants. It may be wise to bring some food, and hopefully you will leave with a Blurite Ore .
Hint: If you want to get an extra sword, get 4 Iron bars and 2 Blurite ores. After Thurgo makes the first sword, drop it and have him make another. Before you talk to the Squire, drop a sword or he will take both. (thanks for the tip, Grogrim!)
When you have the needed items, give them to Thurgo who will make you a Blurite Sword to bring back to the Squire. After giving him the sword, you're finished!
Rewards
12,725 Smithing Experience 1 Quest Point
Pirate's Treasure+

Start: Talk to Redbeard Frank, located in Port Sarim, about treasure.
Skills: The ability to kill a level 4 Gardener.
Quests: None!
What You Need: At least 90gp, a bottle of Karamja Rum, White Apron, Chest Key, and a Spade.
Getting Started
First, talk to Redbeard Frank about any treasure he may know about. Usually he can be found near the Rusty Anchor Bar in Port Sarim, and he says that he will tell you about treasure if you get him some Karamja Rum. So, travel along the walkway and talk to either of the 3 sailors near the boat. When they ask if you want to take a trip to Karamja for 30gp, say yes.
Getting the Rum
Once on Karamja, follow the dirt road until you reach the bar owned by Zambo. Speak with him and buy some Karamja Rum for 30gp. Now, you need to smuggle the Rum off of the island because the Customs Officer will not allow you to bring it to the mainland. Teleporting off of Karamja will cause the Rum to break, and entering the Karamja Volcano will cause it to disappear. There must be a better way...
Head back down the road and talk to Luthas, the banana plantation owner about a job. He says that he will pay you 30gp for each crate of bananas you fill up. Pick about 10 bananas from the trees behind his house, and then walk up to the crate on the other side of the building. Now use the Karamja Rum with the crate to store it, and then pack the crate with bananas.
Talk to Luthas again to collect 30gp, and then leave the island by speaking to the Customs Officer and letting her check you for anything you shouldn't have with you. Once you're off of the island, go to Wydin's Grocery Store and try to get into the back room. Ask him for a job, and he says that you need a White Apron to work for him. You can find one hanging up on a hook behind the counter of the Fishing Shop (next door to the Grocery Store). Go into the back room and search the crate in the middle of the floor for the Rum.
The Pirate's Treasure
Bring the Rum back to Redbeard Frank, who gives you a Chest Key. He says that there's a chest upstairs in the Blue Moon Inn, so head to Varrock. Upstairs in the pub is a chest, and after unlocking it with the key you should find a Pirate Message that reads "Visit the city of the White Knights, in the park Saradomin points to the X which marks the spot." It looks like we're going to Falador.
You're going to need a Spade to dig up the buried treasure, and you can find one in the small house just east of the Furnace in Falador. In the garden you will see a statue of Saradomin pointing west. Right in front of him is a flower bed that crisscrosses like an X, so walk towards the center of it, right-click on the ground and select the "dig" option. Before you can dig the treasure up however, you'll be attacked by a level 4 Gardener. After killing him, dig the treasure up to complete the quest!
Rewards
Treasure: A Cut Emerald, Gold Ring and 450gp.
2 Quest Points
Prince Ali Rescue++

Start: Begin by speaking with Hassan in the Al Kharid Warrior Castle.
Skills: None!
Quests: None!
What You Need: 7 Balls of Wool (or 3 Balls of Wool and a Rope), 2 onions, ashes, flour, water, red berries, a pink skirt, some soft clay, a bronze bar, 3 beers and about 50gp.
Getting Started
Talk to Hassan in the Warrior Castle, located in Al Kharid. Ask him if he needs any help, and it turns out that he actually does, and that Osman can fill you in on the details. Usually he can be found wandering around just outside the castle. When you speak to Osman, he tells you that Prince Ali is being held captive by Lady Keli, and that you need a plan to get him out.
Osman says that you need to tie Lady Keli up, and that you must disguise the prince as her by getting a skirt, a blonde wig and something to color his skin. His daughter Leela may be able to help you out, and she can be found near Draynor Village, standing next to the wheat fields.
Leela tells you more about a disguise, mentioning a woolen wig, a rope, and a witch that may be able to help with the coloring part. She says that you will also need a key, and that something must be done about the guard.
The Rope & Wig
Talk to Ned, a nice old man that can be found a short distance from Leela. Tell him that you need rope, and he says that he will sell you some for 15gp, or he will make you some for just 4 balls of wool. If you don't want to pay, you can shear some sheep by using a pair of shears with a wooly Sheep.
As for the wig, Ned can make you one for 3 balls of wool. Just ask him what else he can make, and then tell him that you need a wig. So, it would be best to get 7 pieces of wool and then spin them on a spinning wheel so that Ned can make you both a Rope and Wig.
Wig & Skin Coloring
Back in Draynor Village, you can find a witch named Aggie. She knows about making dyes and skin coloring, so ask her if she can make you some Yellow Dye for the wig. For this, she needs 2 onions and 5gp. Onions can be found in a garden just east of Rimmington, or behind the Farmer's house in Lumbridge, near the windmill. After having the dye made, use it with the wig to make it a Blonde Wig.
You can also ask Aggie to make some Skin Paste, which changes the color of skin. She needs some ashes, flour, water and red berries to make this. Red berries can be found east of the Stone Circle near Varrock.
Hint: A pink skirt can be bought from the Varrock Clothes Shop for 2gp, so to avoid an extra trip, buy one while you're collecting red berries.
The Jail Key
First, make some Soft Clay by using some water with clay, which can be mined. You can also mine a tin and copper ore and smelt them into a bronze bar. Head over to the jail, located just east of the Draynor Market bank, and speak with Lady Keli.
You can choose any option except for the one about Katrine being better than her. Ask her about her plan, and then ask her if she can be sure that they won't try to get the Prince out of jail. Ask her to see the key, and then ask her if you can see it. Your character will put some clay in their hand and make an imprint of the key.
Now bring the imprint and a bronze bar to Osman and he will make you a bronze key, but you need to get it from Leela. She tells you that there's a guard inside the jail that will be a bit of trouble. After speaking with Joe, you learn that he likes to drink. Speak with Leela again, who says that 3 beers should be enough to get him drunk. You can buy beers from the Port Sarim pub, or take them off the tables in the Barbarian Village.
Rescuing the Prince
Go back to the jail, speak with Joe and ask him if he wants a drink. He'll take a beer, and then you should give him the rest to finish him off. Now use your rope with Lady Keli to tie her up, and use the key with the cell door. Speak with Ali to disguise him, and then go back to Hassan in Al Kharid to get your reward.
Quest complete!
Rewards
700gp
The ability to pass through the Al Kharid Toll Gate for free
3 Quest Points
Restless Ghost+

Start: Begin by speaking with Father Aereck in the Lumbridge Church.
Skills: Able to defeat a level 13 Skeleton.
Quests: None!
What You Need: An Amulet of GhostSpeak.
Getting Started
Firstly, talk to Father Aereck and ask him if he has a quest for you. He can be found inside the Lumbridge church, standing around the altar. He says that he needs someone to make the ghost in the Church Graveyard go away. He mentions that his friend Father Urhney may be able to help you.
Leave the church and follow the road north until you reach the General Store, and then head west along the dirt path until it ends. Now head southeast through the swamp, or head south along the ocean until you find a small house. Talk to Father Urhney and tell him that Father Aereck sent you. Say that a ghost is haunting the graveyard, and he gives you an Amulet of GhostSpeak so that you can talk to it.
Helping the Ghost
Go back to the church in Lumbridge and walk into the graveyard behind it. The ghost is inside the small building in the corner of the graveyard, and you may need to open and close the Coffin to get him to appear. With your new amulet on, speak to the ghost, and when he asks if you understood him, tell him that you did. He says that a Warlock has stolen his skull, and that may be why he can't rest.
Now leave the graveyard and follow the road north until you reach the General Store. Head west along the same dirt path you traveled before, but this time keep to the same direction until you reach a road. Follow it south into the Wizard's Tower, and climb down the ladder. Walk along the corridor to the door on the east side. You'll see an altar; search this to find a Skull. A level 13 Skeleton will then jump out at you, but since you already have the skull, just run away!
Visit the ghost back in the Graveyard, and tell him that you've found his skull. He needs you to put it in his coffin, and after you do so he will be able to rest.
Quest Complete!
Rewards
An Amulet of GhostSpeak - if you ever lose this, you can get another one from Father Urhney for free. Ability to buy gravestones from Father Aerek in the Lumbridge church. 1,125 Prayer Experience 1 Quest Point
Romeo and Juliet++

Start: Talk to Juliet in her house in west Varrock.
Skills: None!
Quests: None!
What You Need: 1 Set of Cadava Berries.
Getting Started
Firstly, talk to Juliet upstairs in her house in west Varrock, just past the Bank. She tells you that she's in love with Romeo and asks if you've seen him. Tell her that you have, and she will give you a Message to give to him. Romeo can usually be found in Varrock Square, wandering around near the large fountain.
When you talk to Romeo, you find that he's quite upset over Juliet. Give him the Message that Juliet gave to you, and he tells you that Juliet's father doesn't want them to get married, and if he sees Romeo, he will kill him. Romeo also says that Father Lawrence may be able to help them with their problem.
The Plan
Father Lawrence can be found in the local Varrock Church, a short distance from Romeo. Go east along the road and then head north past the small fountain to find the Church. Talk to Father Lawrence and a cut-scene will follow.
Now go back to the center of Varrock, and then head south past the Clothes Shop. Just west of the Sword Shop is a small house, home to the Apothecary. Talk to him about making the potion, and he says that you need some Cadava Berries. You can find these in the woods just east of the Stone Circle, and after picking up 1 bunch, bring them back to the Apothecary to make the Cadava Potion.
Head back to Juliet and give her the potion. Once again a cut-scene where you see Juliet drink the potion and fall into a coma. Phillipa does some acting which brings Juliet's father, Draul Leptoc, to the balcony.
Now head back to Romeo and talk to him. He will ask you to accompany him to the crypt, apparently he is not a great hero. Once again, a cut-scene is shown where you will take Romeo by the hand to show him to Juliet.
Enter stage left: Phillipa.
And Romeo, with the eternal words: 'You are a fox', seems to forget all about Juliet, which is later confirmed with the phrase: 'Juliet, who is Juliet?'
Quest complete!
Rewards
5 Quest Points
Rune Mysteries+
Start: Speak to the Duke of Lumbridge, upstairs in Lumbridge Castle.
Skills: None!
Quests: None!
What You Need: Nothing!
Recommended Items: Varrock teleport Runes (3 Air Runes, 1 Fire Rune, 1 Law Rune), Energy Potions (if you're a member)
Recommended Skills: 25 Magic
Map of The Main Quest Area
Getting Started
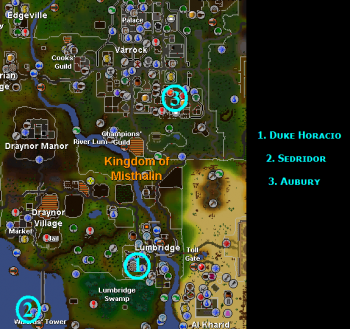
First off, head to Lumbridge Castle. A quick way to get to Lumbridge is by using the Lumbridge Home Teleport spell. Inside, there should be staircases at the back. Climb up one of them and you should arrive on another floor. One of the rooms should contain Duke Horacio. Talk to him and ask him if he has any quests for you. He will tell you about a strange talisman he found and ask you to deliver it to Sedridor, the Head Wizard at the Wizards' Tower. Accept his request and he will give you an Air Talisman.
Sedridor
Head to the Wizards' Tower, just southwest of Lumbridge and directly south of Draynor Village. When you arrive there, enter the western room with ladders in it. Climb the ladder leading downstairs. You should spot Sedridor nearby. Speak to him and tell him that you're looking for the Head Wizard. He'll say that he is and ask you to give the Air Talisman to him. Hand it over to him and he will be stunned. He'll give you a Research Package and tell you to give it to Aubury, located in the Rune shop in Varrock, to the northeast.
Note: If you happen to lose the Research Package, just ask Sedridor for another.
Aubury
Head off to the Varrock Rune shop. Once you arrive there, speak to Aubury. Tell him you've been sent to deliver something to him and he'll ask you to let him study the Research Package. Speak to him again and he will give you some Research Notes.
Note: If you happen to lose the Research Notes, just ask Aubury for another.
Head back to the Wizards' Tower and speak to Sedridor again. Give him the research notes and he will start talking about a new skill you can use, Runecrafting.
Quest complete!
Rewards
Ability to mine Rune Essence
You get to keep the Air Talisman
Ability to use the Runecrafting skill
1 Quest Point
Sheep Shearer+

Start: Begin by speaking to Fred the Farmer about a quest.
Skills: None!
Quests: None!
What You Need: A pair of shears.
Getting Started
To start this quest, talk to Fred the Farmer who can be found by following the northern road from Lumbridge Castle. He's inside the small house in the Chicken Farm alongside the road. Ask him if he has a quest for you, and he says that he needs someone to shear his wooly sheep, and he asks you to bring back 20 Balls of Wool. Before you leave, grab the Shears on the table.
Shearing the Sheep
Now leave the house, enter the pen to the east, and now use your newly-bought shears with the wooly sheep. Wooly sheep are bigger than sheep that have already been sheared. If the sheep doesn't get away from you, you'll get a piece of wool .
Finishing the Quest
After getting 20 pieces of wool, head back to Lumbridge Castle and climb up either ladder. Upstairs is a spinning wheel, which you can spin the wool on. Just use each piece of wool with it to spin it into a ball of wool (gives 2.5 Crafting xp).
Now go back downstairs, leave the castle and go back to Fred. Once you've given him all 20 balls of wool, you're finished with the quest!
Rewards
60gp
150 Crafting experience
1 Quest Point
Shield of Arrav++

Start: By speaking to Reldo, the librarian of Varrock Castle or Charlie the Tramp, located next to the Varrock Weapon Store.
Skills: Ability to fight a level 2 or 23, depending on your selected gang.
Quests: None!
What you Need: A friend who hasn't started the quest, 20gp.
Getting Started
Before starting this quest, you are going to need a friend to help you who has not started this quest yet. Speak to Reldo, located in the Varrock Castle library, north from the entrance of the castle. Ask him for a quest. After a short conversation, he mentions about a book in the nearby shelves that may tell you about a quest. This book can be seen by a blue and white shield in the top shelf, facing away from the desk. After you have read this book, talk to Reldo and he tells you to talk to Baraek, who located outside of Varrock Castle.
Now that both of you have started the quest, decide on the gang that each of you will join. Apparently the Shield was broken in half, and each gang has 1 piece. You'll each have to join a different gang to get both halves.
Phoenix Gang
Baraek can be found outside Varrock Castle in the marketplace, near the fur stall. Ask him about the gang, but before he gives out the location, he wants 20gp. After he tells you about the location of the gang, head along the south wall, walking east until you see a small building with a dungeon symbol. Climb down the ladder and talk to Straven.
Tell him that you know who they are, and that you would like to offer your services. He wants you to get an Intelligence Report from Jonny the Beard, located inside the Blue Moon Inn. After killing him, you should receive an 'Intel report'. Bring that back to Straven and then he will allow you to be in the Phoenix Gang. He will give you a key in return, in which you have access to both the Phoenix hideout and a weapon storage place. Enter the hideout and head southwest until you see a chest. Open and search it and you will receive a left-half shield.
As soon as you get the left-half shield, climb the ladder and walk over to the building east of the hideout. Open the door and climb the ladder to approach a weapon storage building. Inside there is a Weaponmaster who is Level 23 and guards the Phoenix Crossbows. Kill the Weaponmaster and take two Phoenix crossbows on the floor. Give these to your friend in the Black Arm Gang.
Note: Magic attacks do not work on the Weaponmaster.
Black Arm Gang
After you have spoken to Reldo, talk to Charlie the Tramp and ask about the alley behind him. He says that the Black Arm Gang can be found there, and ask if they would let you join. Talk to Katrine, who is inside the building and tell her that you've heard that they are the Black Arm Gang. Ask her if you can become part of the gang, and asks you to steal two Phoenix Crossbows. Make sure your friend has traded you two Phoenix Crossbows.
Give Katrine the crossbows and she makes you part of the gang. Go upstairs and search the cupboard on the east wall for a right-half shield.
Final Steps
Once each of you have half a shield make your way to the Museum, north from Varrock East Bank. Talk to the curator. You will receive either two left half certificates, or two right half certificates. Which certificate you get depends on which gang you're in. Find your partner, and trade them exchanging one of the certificates, so that you both have a left half, and a right half certificate. Use one half with the other to get a full Certificate, and then talk to King Roald in Varrock Castle to redeem your reward.
Congratulations! Quest Completed.
Rewards
600gp
1 Quest Point
Vampire slayer+

Start: Begin by speaking to Morgan in Draynor Village.
Skills: Ability to defeat a level 34 Vampire.
Quests: None!
What You Need: Stake, Hammer, Garlic, 2gp.
Recommended Skills: 20-25 Combat, level 20 Cooking to cook Trout.
Recommended Items: If you don't have level 20 Cooking, you can purchase some cooked Trout from other players.
Getting Started
Start here and talk to Morgan, who will tell you about a vampire in Draynor Manor and will ask you to kill it. He will also tell you about a vampire hunter named Dr. Harlow who is at the Blue Moon Inn. Before you leave however, head upstairs and grab some garlic from the cupboard.
Now make your way to Varrock and as soon as you arrive, head for the general store and buy a hammer if you don’t have one.
Dr. Harlow and the Stake
Head for the sword shop and cross the street to reach the Blue Moon Inn, now buy a beer and speak to the very drunk Dr. Harlow. Tell him Morgan is in trouble and he will agree to help you if you buy him a beer, just say "Ok mate" and talk to him again.
He will take the beer and tell you the three things to kill a vampire:
A stake (which he gives to you)
Garlic (you should have that from Morgan's house)
A hammer (you should have brought one)
Note: Now we are about to kill the vampire so be ready for a very tough fight if you are below level 25. The vampire is level 34 and if no food is brought you could easily die.
The Vampire's Lair
After stopping at the bank to get any last minute supplies, head to the vampire's lair in Draynor Manor. Be warned the trees may attack!
Once you're in the Manor entrance room, walk north into the most northern room. Now walk east and then south and you should enter a room with a checker floor and a staircase leading into the basement. Take the stairs down to enter the vampire's lair.
Hint: If you are a ranger or a mage hide behind the coffin, then attack from there.
When his health bar is completely red you will automatically use the stake and stab the vampire to finish him off.
4,825 Attack experience
3 Quest Points
Witch's potion+

Start: Talk to Hetty the witch in Rimmington.
Skills: None!
Quests: None!
What You Need: An Eye of Newt, a Rat's Tail, an onion, and a piece of burnt meat.
Getting Started
Firstly, visit Hetty the witch in Rimmington and tell her that you're looking for a quest. She says that she may have something for you to do, and she asks you if you want to get better at the "Dark Arts" (a.k.a. Magic). Say yes, and she tells you that she needs a potion consisting of an Eye of Newt, a Rat's Tail, an onion, and a burnt piece of meat.
Making the Potion
All of the ingredients needed for Hetty's potion can be found near Rimmington. You can buy an Eye of Newt from the Magic Emporium in Port Sarim for 3gp. Fresh onions grow in the garden just north of the town. You can find some Rats just south-east of town, which you can kill for meat to later burn on a stove. Kill a small level 1 Rat and pick up their Rat's Tail, another needed ingredient.
Note: If you're too high of a cooking level to burn meat, there's no need to worry! You can simply just re-cook an already-cooked meat to burn it!
After obtaining all of the required ingredients, go back to Hetty and give her all of the items. She mixes a potion in her Cauldron, which you can drink from to complete the quest.
Rewards
325 Magic Experience
1 Quest Point
